Precision, Creativity, and Design –
The VectorArte Way
Illustrate Your Vision with Confidence and Skill
Your Guide to Vector Art &
Digital Illustration
Hi there, and welcome to VectorArte, a space dedicated to helping artists, designers, and creative minds master the art of vector illustration. Whether you’re a complete beginner looking to create your first vector drawing or a seasoned professional refining your skills, this site is here to guide you through the exciting world of digital illustration.
Where Vector Art Meets Innovation and Inspiration
Latest News & Articles
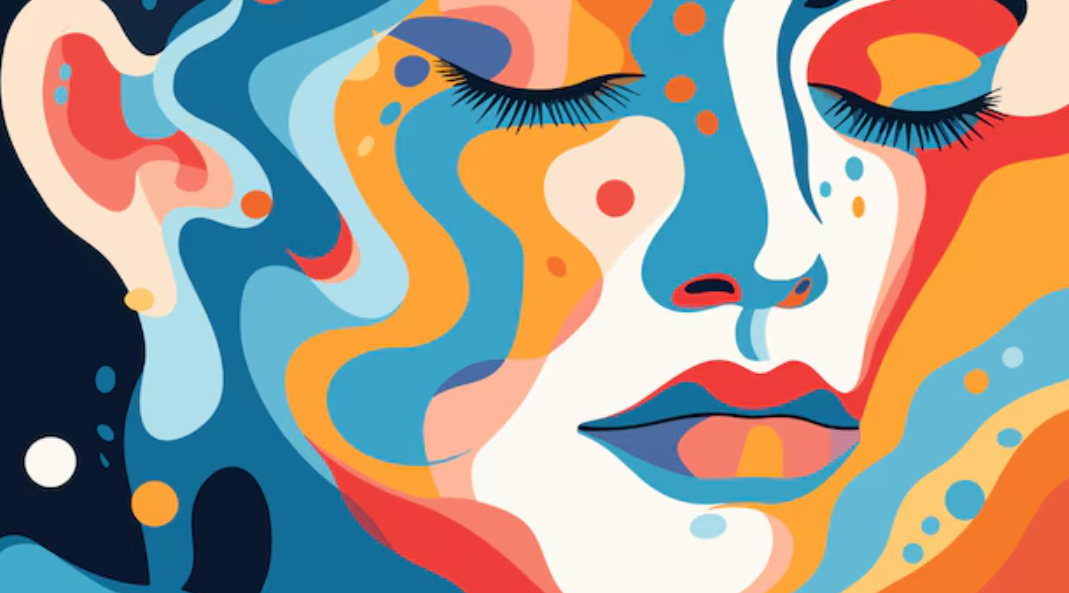
- The Artistic Revolution: How Vector Art is Transforming Digital DesignIn the vibrant world of digital design, **vector art** has emerged as a transformative force, reshaping the way designers create and visual enthusiasts consume digital content. At VectorArte, we celebrate the versatility and precision of vector art, a medium that continues to revolutionize the creative industry. Let’s explore why vector art is making waves and how it can benefit your next project. ## What is Vector Art? Vector art is a form of digital illustration where images are created using mathematical algorithms rather than pixels. Unlike raster graphics, which can become pixelated when scaled, vector graphics maintain their clarity and crispness at any size. This is because they are composed of paths defined by a start and end point, along with other points, curves, and angles. ### Key Features of Vector Art – **Scalability**: Vector images can be resized infinitely without losing quality, making them ideal for everything from small icons to large billboards. – **Editability**: Because vector graphics are made up of individual objects, each element can be easily modified without affecting the overall image. – **Lightweight**: Vector files are generally smaller in size compared to raster images, which makes them easier to store and faster to load. ## The Advantages of Using Vector Art Vector art offers numerous benefits that make it a preferred choice for designers across various industries. Here are some compelling reasons to incorporate vector art into your projects: ### 1. **Precision and Clarity** Vector art provides precision that is unparalleled. Whether you’re designing a detailed logo or intricate illustrations, vectors ensure your artwork remains sharp and clear. This precision is crucial for branding, where clarity is key to maintaining a professional image. ### 2. **Versatile Applications** From logos and branding to web design and animation, vector art has a wide range of applications. Designers can use vectors for print materials like brochures and business cards, digital platforms such as websites and apps, and even interactive media like video games. ### 3. **Cost-Effective** The scalability and editability of vector art can save time and resources. Designers can create a single artwork and repurpose it across multiple platforms without needing to recreate it for different sizes or formats. ### 4. **Creativity Unleashed** With the flexibility of vector art, designers can experiment with complex shapes, vibrant colors, and intricate patterns. The ability to easily tweak and refine designs allows for greater creativity and innovation. ## How to Get Started with Vector Art Getting started with vector art is easier than you might think. Here are a few steps to guide you on your creative journey: ### **1. Choose the Right Software** Several software options are available for creating vector art, each with its unique features. Popular choices include: – Adobe Illustrator – CorelDRAW – Inkscape (a free, open-source alternative) ### **2. Learn the Basics** Familiarize yourself with the fundamental tools and techniques of vector design. Many online tutorials and courses can help you understand the basics, such as creating paths, using the pen tool, and working with layers. ### **3. Start Simple** Begin with simple projects to build your confidence. Try creating basic shapes and gradually progress to more complex designs as you become more comfortable with the tools. ### **4. Experiment and Practice** The key to mastering vector art is practice. Experiment with different styles, colors, and effects. The more you practice, the more proficient you’ll become. ## Conclusion Vector art is more than just a trend in digital design; it’s a powerful tool that offers unmatched precision, versatility, and creative freedom. Whether you’re a seasoned designer or a novice exploring the world of digital art, vector graphics provide endless possibilities for innovation and expression. At VectorArte, we believe in the transformative power of vector art and its ability to elevate any project. So why wait? Dive into the world of vectors and unleash your creativity today!
- Why Every Small Business Needs a Strong Visual Brand (and How Vector Art Can Help)
Running a small business in today’s digital world means you’re not just selling a product or service—you’re selling a brand. And your brand is often the first thing a potential customer notices. From your logo to your social media graphics, visual identity matters more than ever. That’s where vector art becomes a powerful tool in crafting your visual brand and standing out in a crowded marketplace.
When I started working with small business owners as a graphic designer, one thing became clear right away: most were relying on blurry logos, pixelated social media posts, and inconsistent fonts. While their products or services might have been excellent, their branding didn’t reflect that. I’ve always believed that visual branding is more than just design—it’s about trust, credibility, and recognition.
What Is Vector Art—and Why It Matters
Vector art is created using mathematical paths rather than pixels, which means it can be resized to any scale without losing quality. Whether you’re putting your logo on a business card or a billboard, it’ll look crisp and clear. That’s a huge advantage for small businesses that want to look professional across all platforms—from their website to their vehicle wrap.
Beyond logos, vector art is also perfect for creating consistent icons, infographics, and branded illustrations. It helps unify your marketing materials and creates a cohesive experience for customers.
The Power of First Impressions
Think about the last time you visited a website with clunky, outdated visuals. Did it inspire confidence? Probably not. In contrast, when a business has clean, well-designed visuals, it sends a message that they’re serious, modern, and professional.
This is especially important in competitive industries like HVAC, real estate, fitness, or tech. A strong visual identity can be the difference between someone clicking away or staying to learn more. It tells your story, shows your values, and positions you as a brand people can trust.
Helping Businesses Build Better Brands
One of my favorite things about working in vector design is collaborating with businesses that are just starting out or rebranding. There’s something satisfying about taking someone’s vision and turning it into a logo or brand guide they’re proud of. In fact, I’ve helped several local service providers, including AC repair companies, upgrade their branding to something sleek and memorable.
Sometimes, they’re surprised by how much a modern logo and cohesive brand colors can boost customer engagement. But it makes sense—people are visual, and good design makes a lasting impression.
Final Thoughts
If you’re a small business owner, don’t underestimate the power of professional design. Great branding doesn’t have to be expensive or complicated—it just has to be thoughtful and consistent. Whether you’re launching a startup or refreshing your existing look, investing in vector-based design can help set your business apart.
And if you’re already in the creative field like I am, you know that helping others build their brand isn’t just a job—it’s an art form.
- How an AC Technician Saved the Day in My Miramar Office
Working in my Miramar, Florida office has always been a pleasure, but recently, an unexpected event made it even better. Running a business requires focus and a comfortable work environment, and nothing affects productivity quite like an air conditioning system that isn’t performing at its best.
During our routine bi-annual maintenance, our trusted AC repair technician arrived for a scheduled check-up. I always knew that regular maintenance was important, but I never expected this visit to be such a game-changer.
Upon inspection, the technician discovered that our system was on the brink of failure. Over time, small issues had accumulated—clogged filters, inefficient cooling cycles, and parts that needed tuning. He promptly performed several cost-effective fixes, revitalizing the unit’s performance. Within a short time, the immediate difference was palpable—the office became noticeably cooler, and the air felt fresher.
The real surprise came with the next electric bill. It was nearly half of what we usually pay! At first, I thought there had to be a mistake, but after reviewing the numbers, it became clear: the improved efficiency of our AC system had drastically reduced our energy consumption. The efficiency improvements not only enhanced our comfort but also led to significant cost savings.
Finding a Reliable AC Company
One of the biggest challenges in any business is finding service providers that truly care about their customers. I’ve worked with AC companies before, but this was my first experience with a team that took the time to explain everything and ensured that I understood what was being done.
I don’t know much about HVAC systems, so having an honest and transparent technician made all the difference. Instead of pushing unnecessary replacements or expensive upgrades, they focused on practical, effective solutions. It’s a relief to have found a commercial AC company that genuinely prioritizes customer satisfaction over sales.
A Cool and Productive Workspace
With the office environment now optimized, I can focus more on my passion for vector graphics and art. As someone who spends long hours working on digital projects, the last thing I want is to be sweating while trying to concentrate. A cool and comfortable workspace is essential not only for my productivity but also for my employees.
Reflecting on past projects, I’ve designed a few AC company logos before. I wish I had met this team earlier; perhaps I could have contributed to their branding. Who knows? Maybe in the future, I’ll have the opportunity to upgrade their design as well. I love working with businesses that align with my values, and a company that puts customer satisfaction first is definitely one I’d be proud to work with.
A Five-Star Experience
The positive impact of this AC service extends beyond me. My colleagues are happier and more productive in the refreshed environment. Nothing boosts morale quite like a workplace that feels good to be in. I wholeheartedly give this company 5 out of 5 stars for their exceptional work.
Initially, I was skeptical about their maintenance plans. Many companies sell service agreements that don’t seem necessary, but after seeing the results firsthand, I’m thoroughly impressed. I now realize that regular maintenance is worth every penny. The peace of mind alone—knowing that our system won’t break down at the worst possible time—is invaluable.
Extending the Benefits to My Home
After this experience, I’ve scheduled the same company to service my home AC system. If the results are anything like what I’ve seen at the office, I expect to see a major drop in my home electricity bill as well. Comfort, efficiency, and savings—it’s a win-win situation.
If you’re in need of AC repair Miramar, I can’t recommend these professionals enough. Whether it’s an emergency fix, a routine tune-up, or a long-term maintenance plan, finding a dependable AC service can make a significant difference in system performance and energy costs. It’s a decision that pays off in comfort, efficiency, and savings.
- Mastering the Pen Tool: Tips for Perfect Vector Line Work

When I first started working with vector art, the Pen Tool felt like my worst enemy. I struggled to create smooth curves, anchor points never seemed to cooperate, and my lines looked jagged instead of sleek. But over time, I realized that mastering the Pen Tool wasn’t just about technical skills—it was about understanding how vector paths work and practicing the right techniques.
Now, the Pen Tool is one of my favorite tools in vector illustration, and I use it in almost every project. Whether I’m creating a logo, a detailed illustration, or smooth lettering, it’s my go-to for precision and flexibility. If you’re struggling with the Pen Tool or just want to improve your vector line work, here are my best tips to help you master it like a pro.
1. Understand the Basics of Anchor Points and Handles
The Pen Tool works by creating anchor points, which define the shape of your path. There are two main types of anchor points:
✏️ Corner Points – These create sharp, angular lines.
✏️ Smooth Points – These create curves using direction handles.When you click with the Pen Tool, you create a corner point. If you click and drag, you create a smooth point with direction handles that control the curve of the path. The longer the handle, the smoother and broader the curve.
I used to ignore direction handles when I first started, but understanding how they influence curves completely changed my workflow. The key is to think of handles as levers that control the flow of your line work.
2. Learn the Power of the Ctrl (Cmd) and Alt (Opt) Keys
One of the biggest mistakes beginners make is not using keyboard shortcuts to adjust anchor points efficiently. Here are my top shortcuts for working with the Pen Tool:
🖥️ Ctrl (Cmd on Mac) + Click & Drag – Adjusts the position of an anchor point after placing it.
🖥️ Alt (Opt on Mac) + Drag Handle – Moves one handle independently for asymmetrical curves.
🖥️ Ctrl (Cmd) + Click on a Path – Adjusts the entire shape without switching tools.Once I learned how to manipulate paths on the go, I no longer had to delete and redo lines—I could refine them in real time.
3. Mastering Curves: The “Less is More” Rule
One of the biggest mistakes I made as a beginner was adding too many anchor points to my curves. The more points you add, the harder it is to create a smooth and clean shape.
🎨 The golden rule? Use as few anchor points as possible!
Instead of clicking every few pixels, focus on placing points at key curve transitions and let handles do the work. This results in smoother, more professional-looking vector lines.
If you’re struggling with curves, try this exercise:
- Draw a perfect circle using the Pen Tool (instead of the Shape Tool).
- Use only four anchor points (top, bottom, left, right).
- Adjust the handles until the shape looks balanced.
This will teach you how to control curves with minimal points, a skill that will improve all of your vector work.
4. Use the Rubber Band Feature for Better Precision
One of the most helpful (but often overlooked) features in Illustrator is the Rubber Band setting.
🔧 How to enable it:
- Go to Preferences > Selection & Anchor Display
- Check “Enable Rubber Band for Pen Tool”
This feature lets you preview the path before clicking, making it easier to see how your next anchor point will connect. When I turned this on, my accuracy improved instantly!
5. Convert Points to Adjust Angles and Handles
If you ever need to change a straight line into a curve (or vice versa), the Convert Anchor Point Tool (Shift + C) is your best friend.
✔ Click on a curve to remove handles and make it a corner.
✔ Click and drag on a corner to add handles and turn it into a curve.This is especially useful for refining lettering, logos, and character illustrations where you need precise control over line transitions.
6. Practice with Tracing Exercises
One of the best ways to improve your Pen Tool skills is by tracing existing shapes and illustrations. When I was learning, I would:
📄 Import an image into Illustrator or Affinity Designer.
✏️ Use the Pen Tool to trace over the outlines.
🔍 Focus on using fewer anchor points and smooth curves.Some good practice shapes include:
- Simple logos (like Apple or Twitter’s bird)
- Typography and hand-lettered words
- Silhouettes of animals or objects
After a few sessions of tracing, you’ll start to see patterns in how vector lines flow, and your muscle memory will improve.
7. Be Patient and Keep Practicing!
Mastering the Pen Tool doesn’t happen overnight—I know from experience! But if you:
✅ Start with simple exercises
✅ Use the right shortcuts and tools
✅ Practice curves and minimal anchor pointsYou’ll gradually build confidence and control, and soon you’ll be creating beautiful, professional vector line work.
Final Thoughts
The Pen Tool is one of the most powerful tools in vector illustration, and once you master it, you’ll unlock a whole new level of creative possibilities.
So grab your tablet or mouse, open your design software, and start experimenting! With time and practice, you’ll turn wobbly lines into flawless vector art. 🎨✨
- Retro vs. Modern: How Vector Styles Have Evolved Over Time

When I first got into vector illustration, I was fascinated by how the art style has evolved over the years. From the bold, blocky aesthetics of vintage posters to the sleek, minimalist designs of today, vector art has transformed alongside technology, trends, and the needs of designers.
Both retro and modern vector styles have their own unique appeal, and I love exploring how they influence everything from branding to digital art. If you’ve ever wondered how vector design has evolved or if you’re trying to find inspiration for your next project, let’s take a deep dive into how vector styles have changed over time and where they might be headed next.
The Retro Vector Aesthetic: Bold, Vibrant, and Nostalgic
The roots of vector art go back to mid-century graphic design, where advertising, posters, and magazine illustrations featured bold, hand-drawn elements with limited color palettes. Some of the most iconic retro styles that still influence vector art today include:
1. 1950s-1970s: The Birth of Commercial Vector-Like Art
Before digital vector tools, illustrators created flat, vibrant illustrations using hand-drawn techniques. Some characteristics of this era include:
🎨 Thick outlines and flat colors – Think vintage comic books and pop art.
🎨 Screen printing textures and halftones – Used for posters and advertisements.
🎨 Playful, exaggerated characters – Found in cartoons and mid-century branding.One of my favorite inspirations from this time is Saul Bass, a graphic designer known for his minimalist yet expressive movie posters and title sequences (Vertigo, North by Northwest). His work used simple vector-like shapes, limited colors, and bold typography—an approach that is still used today in modern vector design.
2. 1980s-1990s: The Digital Revolution Begins
By the 1980s, early digital tools started shaping vector design. This era brought in:
🕶 Neon gradients and geometric shapes – A key feature of the 80s synthwave aesthetic.
📼 Pixelated and vector hybrid designs – Seen in early video game art and advertisements.
🖥 Adobe Illustrator (1987) – This software changed the game, making it easier to create clean, scalable vector graphics.I still love incorporating 80s-inspired gradients and geometric compositions into my work—it adds an element of nostalgia while still feeling fresh and vibrant.
The Modern Vector Aesthetic: Minimal, Versatile, and Clean
Fast-forward to today, and vector art has become smoother, more precise, and highly versatile. Modern vector design is driven by:
1. The Rise of Flat Design & Minimalism (2010s-Present)
Gone are the over-the-top gradients of the early 2000s—modern vector art embraces flat, minimal, and clean compositions. Features include:
🌍 Simple, bold color palettes – Less shading, more clarity.
🔲 Geometric, precise shapes – Think of UI icons, app graphics, and logos.
📱 Scalability for digital use – Designed to be responsive across mobile and desktop screens.Apple, Google, and many big brands have shifted toward flat vector design because it’s clean, professional, and easy to read on all devices.
2. The Comeback of Gradients & 3D Depth (2020s)
While flat design is still popular, the past few years have seen a resurgence of:
🎨 Soft gradients – Instead of harsh 90s neon, we see subtle, pastel-like transitions.
📦 3D vector illustrations – Used in branding, product illustrations, and UI design.
✨ Blended retro-modern aesthetics – Think neon 80s meets futuristic minimalism.I love how modern vector art combines functionality and aesthetics, making designs versatile, sleek, and visually engaging.
Retro vs. Modern: Which Vector Style Should You Choose?
Both retro and modern vector styles have their own advantages, and the best one for your project depends on your audience, brand, and creative vision.
Feature Retro Vector Style Modern Vector Style Aesthetic Nostalgic, bold, playful Clean, sleek, minimalist Color Palette Muted tones, warm colors, grainy textures Bright, solid colors, smooth gradients Usage Posters, retro branding, vintage ads Digital apps, websites, UI design Best For Fun, expressive branding Professional, corporate, and scalable designs For instance:
- If I’m designing a fun, retro-style poster, I’ll use bold, thick outlines and halftone textures.
- If I’m working on an app interface, I’ll stick to minimal, clean icons that are easy to read on screens.
The best part? You can blend both styles! A mix of retro-inspired elements with modern, clean execution can create something truly unique.
The Future of Vector Art
Looking ahead, I think we’ll see:
🔮 More interactive vector art – Animated SVGs and motion graphics will keep growing.
🎭 AI-assisted vector creation – Tools like Adobe Sensei and AI-powered design software will make vector art even more accessible.
🌈 Fusion of retro & futuristic elements – Think 80s neon meets ultra-modern UI design.As a designer, I love seeing how vector art continues to evolve. Whether you’re drawn to the bold expressiveness of retro design or the clean precision of modern vectors, there’s always something new to explore.
So, whether you’re designing a retro poster or a sleek website icon, just remember: vector art is timeless, and its possibilities are endless! 🎨✨
- Vector Art 101: A Beginner’s Guide to Creating Stunning Illustrations

When I first started exploring vector art, I was amazed at how clean, sharp, and scalable the illustrations were. Unlike pixel-based images that lose quality when resized, vector graphics maintain their crispness no matter how big or small you make them. That’s why vector art is the gold standard for everything from logos and icons to digital illustrations and branding materials.
If you’re new to vector illustration, don’t worry—I’ve been there! The good news is that learning vector art doesn’t have to be overwhelming. With the right tools, techniques, and mindset, you’ll be on your way to creating stunning digital artwork in no time. In this guide, I’ll walk you through the basics of vector art and share essential tips to get you started.
What is Vector Art?
Before we dive into the creative process, let’s quickly define vector art.
Vector art is created using mathematical equations rather than pixels. This means that vector images are made up of points, lines, curves, and shapes, all connected through paths. Because of this structure, vector art can be resized infinitely without losing quality—making it perfect for professional design work.
Common vector file formats include:
✅ AI (Adobe Illustrator) – Native format for Adobe Illustrator
✅ SVG (Scalable Vector Graphics) – Used for web design and digital applications
✅ EPS (Encapsulated PostScript) – Ideal for printing and logos
✅ PDF (Portable Document Format) – Can store vector data for sharing
Step 1: Choosing the Right Vector Software
To create vector illustrations, you’ll need vector-based design software. Here are a few of the most popular options:
🎨 Adobe Illustrator – The industry standard for vector art, packed with powerful tools.
🎨 Affinity Designer – A budget-friendly alternative to Illustrator with a strong feature set.
🎨 CorelDRAW – A favorite among graphic designers, particularly for branding.
🎨 Inkscape – A free and open-source option for beginners and professionals alike.I personally love working with Adobe Illustrator because of its versatility, but if you’re just starting out, Inkscape is a fantastic free tool to get familiar with vector illustration.
Step 2: Mastering Basic Vector Tools
To create vector art, you’ll need to get comfortable with a few essential tools. Here are the ones I use the most:
✏️ Pen Tool – The most powerful tool for creating precise lines and curves (and often the trickiest to master!).
🖌 Brush Tool – Allows for more organic, freehand strokes.
🔺 Shape Tools – Includes rectangles, circles, polygons, and stars, which can be combined to create complex illustrations.
📐 Anchor Points & Paths – The backbone of vector art, letting you manipulate shapes with precision.
🎭 Layers & Groups – Helps you organize different elements of your artwork.When I first started, the Pen Tool felt intimidating, but with practice, it became my favorite tool for creating smooth, professional-looking vector illustrations.
Step 3: Creating Your First Vector Illustration
Now for the fun part—creating your first vector artwork! Here’s a simple step-by-step process to get started:
1. Start with a Simple Concept
Think of something easy to illustrate, like a fruit, a house, or a simple character. Avoid complicated shapes at first—start small!
2. Use Basic Shapes
Open your design software and use the rectangle, ellipse, and polygon tools to block out the basic structure of your illustration. Many professional vector artists build complex illustrations from simple geometric shapes.
3. Add Details with the Pen Tool
Use the Pen Tool to refine your shapes, add curves, and create custom paths. If you struggle with curves, use the handles on anchor points to smooth them out.
4. Apply Colors and Gradients
One of the coolest things about vector art is flat design and gradients. Experiment with solid colors, linear gradients, and radial gradients to add depth and dimension to your illustration.
5. Fine-Tune and Export
Once you’re happy with your illustration, adjust details, clean up any extra anchor points, and export your file in a vector format like SVG or AI for future editing.
Tips for Improving Your Vector Art Skills
When I was learning vector art, I picked up some valuable lessons along the way that made a big difference in my work:
✔️ Practice with Simple Exercises – Trace over existing vector art or use reference images to improve your precision.
✔️ Study Other Artists – Look at vector artists’ work and break down how they use shapes, colors, and shading.
✔️ Learn Keyboard Shortcuts – Speed up your workflow with Illustrator shortcuts like Ctrl+Z (undo) and Alt+drag (duplicate).
✔️ Experiment with Different Styles – Try minimalist vector art, flat design, or even vectorized hand-drawn sketches.
✔️ Stay Patient and Keep Practicing – Like any skill, vector art takes time to master. The more you practice, the more confident you’ll become.
Final Thoughts
Vector art is an incredible skill to learn, whether you’re creating illustrations for fun, working on branding projects, or designing icons for apps and websites. When I started, it felt overwhelming, but with practice, patience, and the right tools, it quickly became one of my favorite creative outlets.
So, if you’re new to vector illustration, just start—open up a design program, experiment with shapes, and have fun! Every masterpiece begins with a single anchor point.
Welcome to the world of vector art—I can’t wait to see what you create! 🎨✨